VLESS是一种很轻的协议,和Trojan一样,不对流量进行复杂的加密和混淆,而是通过TLS协议加密,混杂在其他HTTPS流量中,在墙内外穿进穿出。为了更好的伪装以应对主动探测,Fallbacks回落功能随VLESS同时出现。本文将演示如何使用Xray中VLESS入站协议的回落功能配合Nginx或Caddy在保证伪装完全的前提下实现按域名分流。
应用情景
由于XTLS,Xray需要监听443端口,这导致如果之前有网站运行在服务器上,那么此时网站无法运行或需要运行在其他端口上,这显然是不合理的。有以下三种方案可以解决这个问题:
-
Xray监听其他常用端口(如22、3389、8443),这个方案是最简单的,但不够完美。
-
Nginx或HAProxy监听443端口,通过SNI分流做L4反向代理,实现端口复用,这个方案比较复杂,需要对Nginx或HAProxy的使用有一定了解,此处不作过多解释。
-
Xray监听443端口,通过Fallbacks功能SNI分流将网站流量回落到Nginx或Caddy,这个方案难度适中,也是本文接下来要演示的方案。
SNI简介
服务器名称指示(英语:Server Name Indication,缩写:SNI)是TLS的一个扩展协议。熟悉反向代理的人知道,如果想要通过域名将流量代理到正确的内容上,需要以下配置:
1
|
proxy_set_header Host 主机名;
|
这句的作用是将名为“Host”的HTTP Header设定为某个主机名。为什么要这样做?一般而言,一台服务器对应一个IP,但却运行多个网站,访问者通过域名查询到IP以访问服务器,那么问题来了,如何确定访问者想要访问的是哪一个网站?这需要“基于名称的虚拟主机”。
当Web服务器收到访问请求后,它会查看请求的主机头,使访问者访问正确的网站。然而当HTTP协议被TLS协议加密后,这种简单的方法就无法实现了。因为TLS握手发生在服务器看到任何HTTP头之前,因此,服务器不可能使用HTTP主机头中的信息来决定呈现哪个证书,更无法决定访问者的访问目标。
SNI的原理也很简单,它通过让客户端发送主机名作为TLS协商的一部分来解决此问题。所以在使用Nginx对HTTPS协议进行反向代理时,需要在配置中加入proxy_ssl_server_name on;,此时Nginx会向被代理的服务器发送SNI信息,解决了HTTPS协议下虚拟主机失效的问题。另外,使用SNI时,即使不指定主机头,也可以正确访问网站。
思路
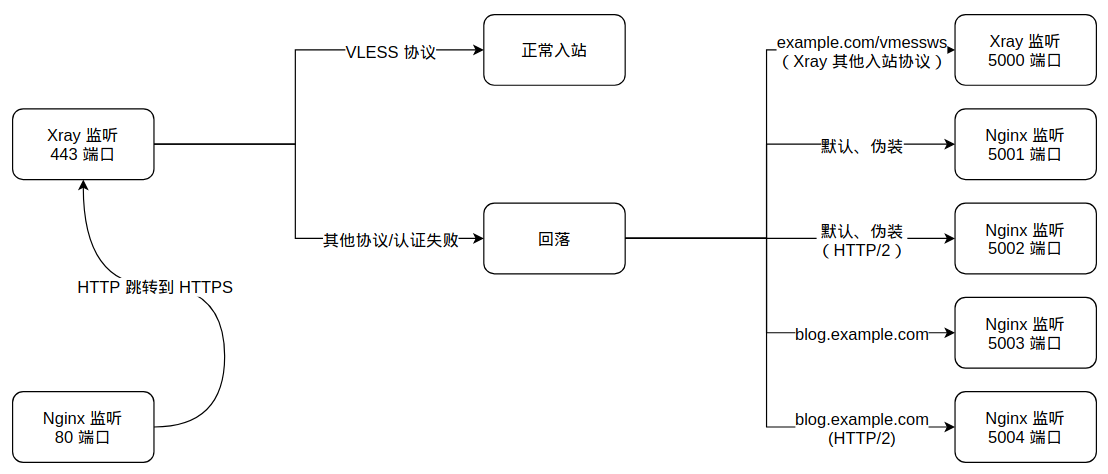
从443端口接收到流量后,Xray会把TLS解密后首包长度小于18、协议版本无效或身份认证失败的流量通过对name、path、alpn的匹配转发到dest指定的地址。
添加DNS记录
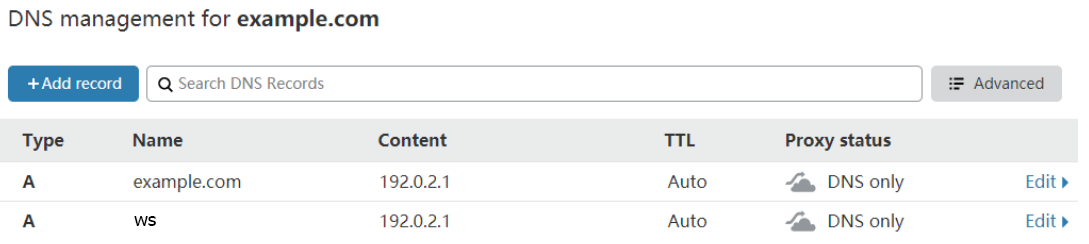
请按实际情况修改域名和IP。
申请TLS证书
由于要对不同前缀的域名进行分流,但一个通配符证书的作用域仅限于两“.”之间(例如:申请*.example.com,example.com和*.*.example.com并不能使用该证书),故需申请SAN通配符证书。根据Let’s Encrypt官网信息,申请通配符证书要求DNS-01验证方式,此处为NS记录为Cloudflare的域名通过acme.sh申请Let’s Encrypt的免费TLS证书。使用其他域名托管商的申请方法见dnsapi · acmesh-official/acme.sh Wiki。
首先需要到Cloudflare面板创建API Token。参数如下:

权限部分至关重要,其他部分任意。
创建完毕后,你会得到一串神秘字符,请将其妥善保管到安全且不会丢失的地方,因为它不再会显示。这串字符就是即将用到的CF_Token。
注意:以下操作需要在root用户下进行,使用sudo会出现错误。
1
2
3
4
5
|
curl https://get.acme.sh | sh # 安装 acme.sh
export CF_Token="t2pOuNSg7r9lnqgmyHcQ48FA1FdZPw" # 设定API Token变量
acme.sh --issue -d example.com -d *.example.com --keylength ec-256 --dns dns_cf # 使用DNS-01验证方式申请证书
mkdir /usr/local/ssl/xray # 新建证书存放目录
acme.sh --install-cert -d example.com --ecc --fullchain-file /usr/local/ssl/xray/cert.pem --key-file /usr/local/ssl/xray/privkey.key --reloadcmd "chown xray:xray -R /usr/local/ssl/xray && systemctl restart xray" # 安装证书到指定目录并设定自动续签生效指令
|
Xray配置
针对Nginx的配置为:
 1
 2
 3
 4
 5
 6
 7
 8
 9
10
11
12
13
14
15
16
17
18
19
20
21
22
23
24
25
26
27
28
29
30
31
32
33
34
35
36
37
38
39
40
41
42
43
44
45
46
47
48
49
50
51
52
53
54
55
56
57
58
59
60
61
62
63
64
65
66
67
68
69
70
71
72
73
74
75
76
77
78
79
80
81
82
83
84
85
86
87
88
|
{
  "log": {
    "loglevel": "warning"
  },
  "inbounds": [
    {
      "port": 443,
      "protocol": "vless",
      "settings": {
        "clients": [
          {
            "id": "UUID",
            "flow": "xtls-rprx-direct"
          }
        ],
        "decryption": "none",
        "fallbacks": [
          {
            "name": "ws.example.com",
            "path": "/vmessws",
            "dest": 6000,
            "xver": 1
          },
          {
            "dest": 6001,
            "xver": 1
          },
          {
             "alpn": "h2",
             "dest": 6002,
             "xver": 1
          },
          {
            "name": "example.com",
            "dest": 6003,
            "xver": 1
          },
          {
            "name": "example.com",
            "alpn": "h2",
            "dest": 6004,
            "xver": 1
          }
        ]
      },
      "streamSettings": {
        "network": "tcp",
        "security": "xtls",
        "xtlsSettings": {
          "alpn": [
            "h2",
            "http/1.1"
          ],
          "certificates": [
            {
              "certificateFile": "/usr/local/ssl/xray/cert.pem",
              "keyFile": "/usr/local/ssl/xray/privkey.key"
            }
          ]
        }
      }
    },
    {
      "port": 6000,
      "listen": "127.0.0.1",
      "protocol": "vmess",
      "settings": {
        "clients": [
          {
            "id": "UUID"
          }
        ]
      },
      "streamSettings": {
        "network": "ws",
        "wsSettings": {
          "acceptProxyProtocol": true,
          "path": "/vmessws"
        }
      }
    }
  ],
  "outbounds": [
    {
      "protocol": "freedom"
    }
  ]
}
|
- 有关Proxy Protocol
Proxy Protocol是HaProxy开发的一种旨在解决代理时容易丢失客户端信息问题的协议,常用于链式代理和反向代理。传统的处理方法往往较为复杂且有诸多限制,而Proxy Protocol非常简单地在传输数据时附带上原始连接四元组信息的数据包,解决了这个问题。
凡事皆有利弊,Proxy Protocol也是如此。
- 有发送必须有接收,反之亦然
- 同一端口不能既兼容带Proxy Protocol数据的连接又兼容不带数据的连接(如:Nginx同端口的不同虚拟主机(server),本质是上一条)
在遇到异常时,请考虑配置是否符合上述条件。
此处,使用Proxy Protocol让被回落到的目标获取到客户端的真实IP。
另外,当Xray的某个入站配置存在"acceptProxyProtocol": true时,ReadV将失效。
- 有关HTTP/2
首先,inbounds.streamSettings.xtlsSettings.alpn有顺序,应将h2放前,http/1.1放后,在优先使用HTTP/2的同时保证兼容性;反过来会导致HTTP/2在协商时变为 HTTP/1.1,成为无效配置。
在上述配置中,每条回落到Nginx的配置都要分成两个。这是因为h2是强制TLS加密的HTTP/2连接,这有益于数据在互联网中传输的安全,但在服务器内部没有必要;而h2c是非加密的HTTP/2连接,适合该环境。然而,Nginx不能在同一端口上同时监听HTTP/1.1和h2c,为了解决这个问题,需要在回落中指定alpn项,以尝试匹配TLS ALPN协商结果。
使用Caddy就不必如此繁杂了,因为它可以在同一端口上同时监听HTTP/1.1和h2c,配置改动如下:
 1
 2
 3
 4
 5
 6
 7
 8
 9
10
11
12
13
14
15
16
17
|
"fallbacks": [
  {
    "name": "ws.example.com",
    "path": "/vmessws",
    "dest": 6000,
    "xver": 1
  },
  {
    "dest": 6001,
    "xver": 1
  },
  {
    "name": "example.com",
    "dest": 6002,
    "xver": 1
  }
]
|
Nginx配置
Nginx将通过官方源进行安装。
1
2
3
4
5
6
|
apt install curl gnupg2 ca-certificates lsb-release
echo "deb http://nginx.org/packages/debian `lsb_release -cs` nginx" \
    | tee /etc/apt/sources.list.d/nginx.list
curl -fsSL https://nginx.org/keys/nginx_signing.key | apt-key add -
apt update
apt install nginx
|
创建并编辑vim /etc/nginx/sites-available/example.com文件,内容如下:
 1
 2
 3
 4
 5
 6
 7
 8
 9
10
11
12
13
14
15
16
17
18
19
20
21
22
23
24
25
26
27
28
29
30
|
set_real_ip_from 127.0.0.1;
real_ip_header proxy_protocol;

server {
    listen 127.0.0.1:6001 proxy_protocol default_server;
    listen 127.0.0.1:6002 proxy_protocol default_server http2;
    root /var/www/default;
    index index.html index.php;
}

server {
    listen 127.0.0.1:6003 proxy_protocol;
    listen 127.0.0.1:6004 proxy_protocol http2;

    server_name example.com;
    root /var/www;
    index index.html index.php;

    location ~ \.php$ {
        fastcgi_pass unix:/var/run/php/php7.0-fpm.sock;
        # fastcgi_pass 127.0.0.1:9000;
        fastcgi_param SCRIPT_FILENAME $document_root$fastcgi_script_name;
        include fastcgi_params;
    }
}

server {
    listen 80;
    return 301 https://$host$request_uri;
}
|
重新载入nginx配置,systemctl reload nginx。
Caddy配置
Caddy将通过官方源进行安装。
1
2
3
4
5
|
apt install -y debian-keyring debian-archive-keyring apt-transport-https
curl -1sLf 'https://dl.cloudsmith.io/public/caddy/stable/gpg.key' | apt-key add -
curl -1sLf 'https://dl.cloudsmith.io/public/caddy/stable/debian.deb.txt' | tee /etc/apt/sources.list.d/caddy-stable.list
apt update
apt install caddy
|
为了使Caddy能获取到访问者的真实IP,需要编译带有Proxy Protocol模块的Caddy。建议直接在Caddy官网上在线编译。
1
2
3
4
|
systemctl stop caddy
curl -o /usr/bin/caddy "https://caddyserver.com/api/download?os=linux&arch=amd64&p=github.com%2Fmastercactapus%2Fcaddy2-proxyprotocol&idempotency=79074247675458"
chmod +x /usr/bin/caddy
systemctl start caddy
|
编辑vim /etc/caddy/Caddyfile文件,内容如下:
 1
 2
 3
 4
 5
 6
 7
 8
 9
10
11
12
13
14
15
16
17
18
19
20
21
22
23
24
25
26
27
28
29
30
31
32
33
34
35
36
37
|
{
    servers 127.0.0.1:6001 {
        listener_wrappers {
            proxy_protocol
        }
    protocol {
            allow_h2c
        }
    }
    servers 127.0.0.1:6002 {
        listener_wrappers {
            proxy_protocol
        }
    protocol {
            allow_h2c
        }
    }
}

:6001 {
    root * /var/www/default
    file_server
    log
    bind 127.0.0.1
}

:6002 {
    root * /var/www/qoant
    php_fastcgi unix//run/php/php7.0-fpm.sock
    file_server
    log
    bind 127.0.0.1
}

:80 {
    redir https://{host}{uri} permanent
}
|
重新载入caddy配置,systemctl reload caddy。