前言
Xray已经出来一段时间了,之前一直使用VLESS+tls+ws方式科学上网。但是了解了下XTLS黑科技,再看看Xray性能测试,这货简直爆炸,性能是TLS的数倍。但是Xray要监听443端口(不监听也行,但是不够完美),影响做站。虽然有解决方法,可是不够完整,一不小心就跳坑里面去了。Xray已经带了SNI回落功能,Nginx也带SNI功能,我还是觉得用Nginx的比较好,免得折腾Xray影响网站运行。
问题
因为服务器上有几个站点,装完Xray后实现SNI分流,过程非常顺利,但是chrome上有问题,几个二级域名访问的内容全部和第一个访问的域名一样。
例如:我先访问a.example.com然后在访问b.example.com,b.example.com响应内容和a.example.com一模一样,然后再访问c.example.com还是和a.example.com一样。开chrome隐身模式直接访问c.example.com正常,然后访问a.example.com或b.example.com内容又全是c.example.com 的(不一定会每次都这样,要看浏览器是否使用现有连接或服务器是否断开了之前的连接)。
这个问题折腾我很长时间,最后发现和HTTP/2有关,我所有站点不使用HTTP/2就会正常,只要有一个站点使用了HTTP/2,你先访问HTTP/2站点,那么后面的其他子域名都会变成它的内容。
最开始我使用Xray的SNI也是这样,我还以为是Xray SNI的问题,之后换成Nginx使用SNI还是这样。chrome中有这个问题,用手机safari浏览器完全正常。
经过网上一番搜刮,终于找到了问题根源:通配符域名证书。
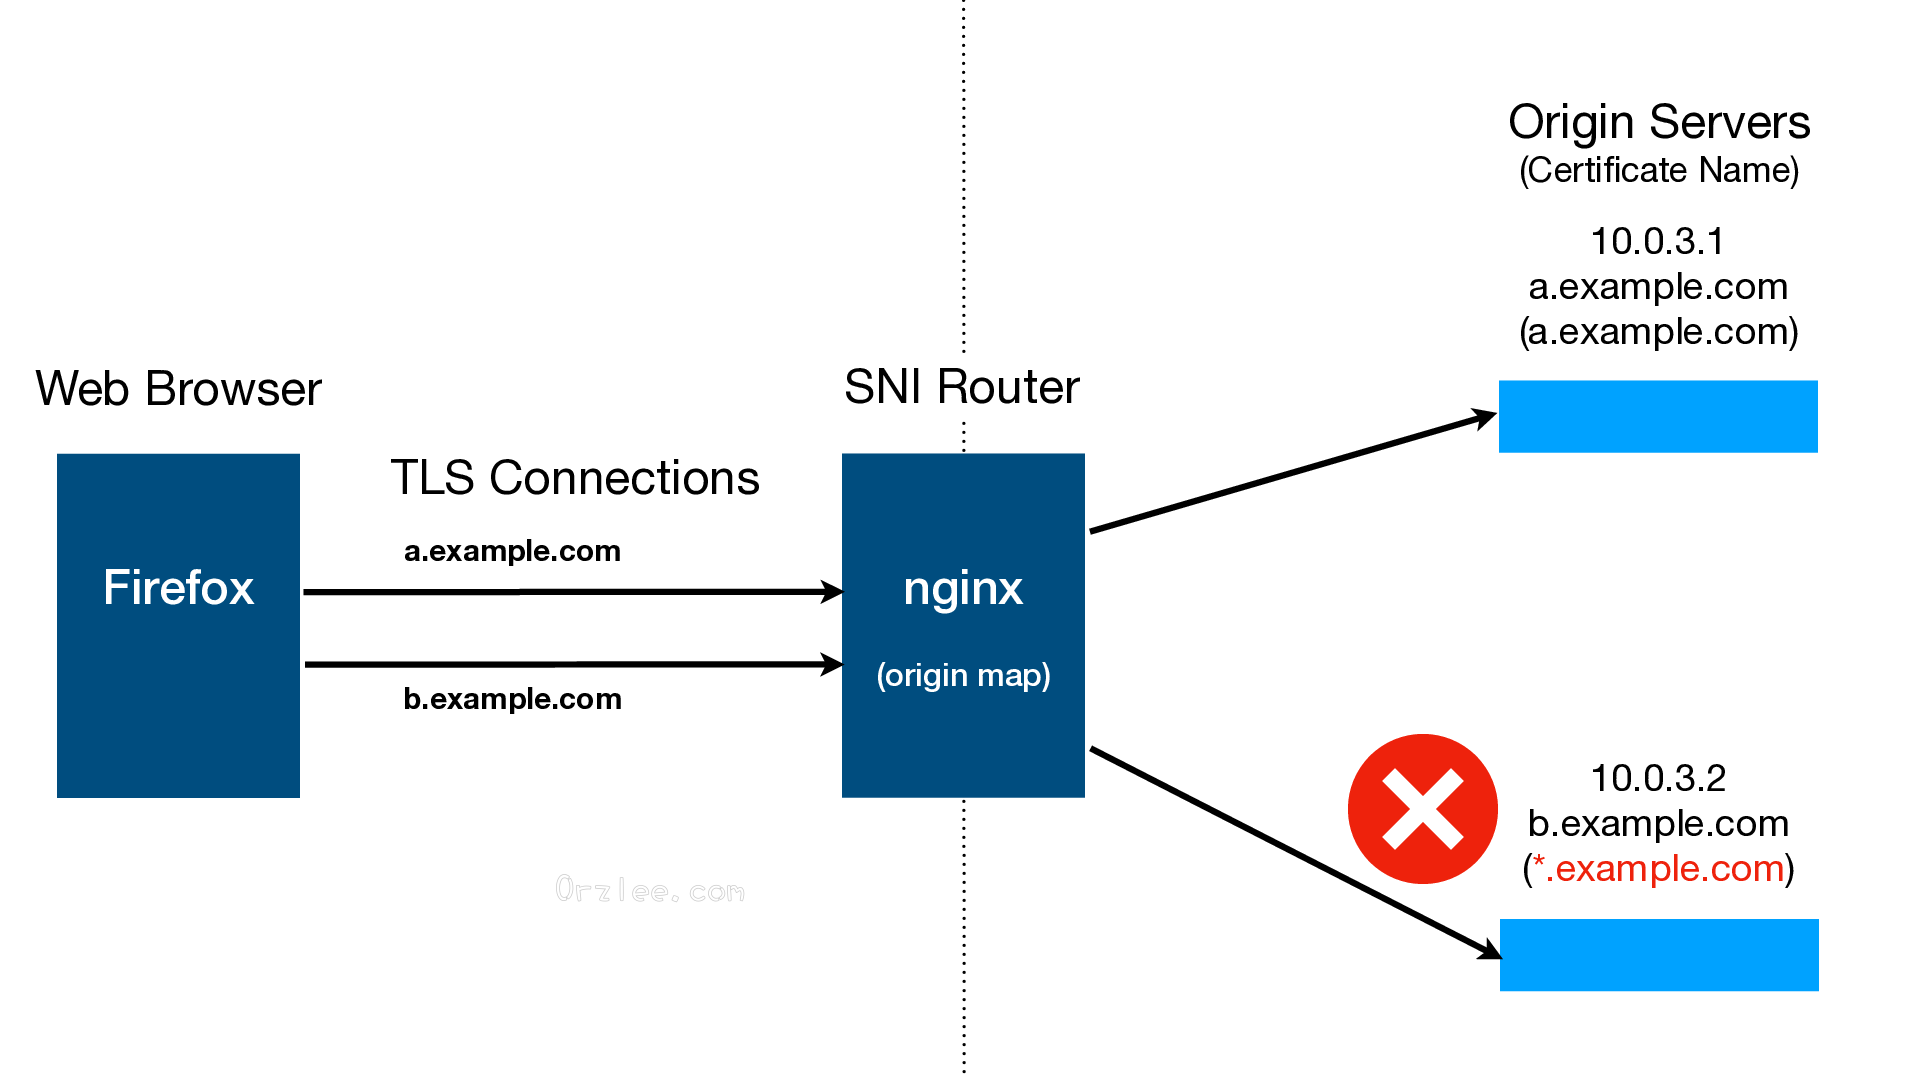
由于原始服务器10.0.3.2使用的TLS证书具有通配符名称*.example.com,因此Web浏览器可以建立服务器名称为b.example.com的TLS连接,并对HTTP/2请求使用相同的连接到a.example.com。这可能会在网站和应用程序中导致未定义的行为。
因为HTTP/2会保持TCP连接,导致你访问了a.example.com后,在访问b.example.com的时候使用的同一个连接,SNI跟失效了一样,直接使用该连接访问之前的服务。
解决办法有两种:
- 不使用HTTP/2。
- 不使用通配符域名证书,站点域名证书一个个申请。
配置Nginx SNI
由于默认安装的Nginx不会构建http_realip及stream_ssl_preread模块,需手动添加--with-http_realip_module --with-stream_ssl_preread_module两个参数再编译安装Nginx,使用nginx -V命令可查看已安装的模块。
在主配置文件nginx.conf的events和http之间插入stream_ssl_preread模块,插入后的配置文件如下:
 1
 2
 3
 4
 5
 6
 7
 8
 9
10
11
12
13
14
15
16
17
18
19
20
21
22
23
24
25
26
27
28
29
30
31
32
33
34
35
36
37
38
39
40
|
user  www;

events {
    use epoll;
    worker_connections 51200;
    multi_accept on;
}

stream {
    map $ssl_preread_server_name $name {
        x.example.com xray;
        example.com blog;
    }
    upstream xray {
        server 127.0.0.1:6004; # xray xtls伪装站点
    }
    upstream xtls {
        server 127.0.0.1:6443; # Xray端口
    }
    upstream blog {
        server 127.0.0.1:6003; # 业务站点
    }

    server {
        listen 443 reuseport;
        listen [::]:443 reuseport;
        proxy_pass $name;
        ssl_preread on;
        proxy_protocol on;
    }
    server {
        # Xray XTLS
        listen 127.0.0.1:6004 proxy_protocol;
        proxy_pass xtls;
    }
}

http {
  ...
}
|
伪装站点及业务站点的配置:
 1
 2
 3
 4
 5
 6
 7
 8
 9
10
11
12
13
14
15
16
17
18
19
20
21
22
23
24
25
26
27
28
29
30
31
32
33
34
35
36
37
38
39
40
41
42
43
44
45
46
47
48
49
50
51
52
53
54
55
56
|
http {
    set_real_ip_from 127.0.0.1; # 获取真实客户IP,不然全是127.0.0.1
    real_ip_header proxy_protocol;
    port_in_redirect off; # 重定向去掉端口号

    fastcgi_connect_timeout 300;
    fastcgi_send_timeout 300;
    fastcgi_read_timeout 300;
    fastcgi_buffer_size 64k;
    fastcgi_buffers 4 64k;
    fastcgi_busy_buffers_size 128k;
    fastcgi_temp_file_write_size 256k;

    server {
        listen 80;
        server_name x.example.com;
        return 301 https://x.example.com$request_uri;
    }

    server {
        # 伪装站点由Xray处理SSL
        listen 127.0.0.1:6001 proxy_protocol; # xray http/1.1
        listen 127.0.0.1:6002 proxy_protocol http2; # xray http/2

        server_name x.example.com;
        index index.html index.htm index.php;
        root /home/wwwroot/default;
    }

    server {
        listen 80;
        server_name example.com;
        return 301 https://example.com$request_uri;
    }

    server {
        listen 127.0.0.1:6003 proxy_protocol ssl http2;

        server_name example.com;
        root /home/wwwroot/example.com;
        index index.html index.htm index.php;

        ssl_certificate /etc/ssl/nginx/example.com.pem;
        ssl_certificate_key /etc/ssl/nginx/example.com.key;

        include enable-php-pathinfo.conf;

        location ~ \.php$ {
            # fastcgi_pass unix:/var/run/php/php7.0-fpm.sock;
            fastcgi_pass 127.0.0.1:9000;
            # fastcgi_index index.php;
            fastcgi_param SCRIPT_FILENAME $document_root$fastcgi_script_name;
            include fastcgi_params;
        }
    }
}
|
配置Xray
服务端配置:
 1
 2
 3
 4
 5
 6
 7
 8
 9
10
11
12
13
14
15
16
17
18
19
20
21
22
23
24
25
26
27
28
29
30
31
32
33
34
35
36
37
38
39
40
41
42
43
44
45
46
47
48
49
50
51
52
53
54
55
56
57
58
59
60
61
62
63
64
65
66
67
68
69
70
71
72
73
74
75
76
77
|
{
  "log": {
    "loglevel": "warning"
  },
  "inbounds": [
    {
      "port": 6443,
      "listen": "127.0.0.1",
      "protocol": "vless",
      "settings": {
        "clients": [
          {
            "id": "UUID",
            "flow": "xtls-rprx-direct"
          }
        ],
        "decryption": "none",
        "fallbacks": [
          {
            "dest": 6001,
            "xver": 1
          },
          {
             "alpn": "h2",
             "dest": 6002,
             "xver": 1
          },
          {
            "path": "/vmessws",
            "dest": 6000,
            "xver": 1
          }
        ]
      },
      "streamSettings": {
        "network": "tcp",
        "security": "xtls",
        "xtlsSettings": {
          "alpn": [
            "h2",
            "http/1.1"
          ],
          "certificates": [
            {
              "certificateFile": "/usr/local/ssl/xray/example.com.pem",
              "keyFile": "/usr/local/ssl/xray/example.com.key"
            }
          ]
        }
      }
    },
    {
      "port": 6000,
      "listen": "127.0.0.1",
      "protocol": "vmess",
      "settings": {
        "clients": [
          {
            "id": "UUID"
          }
        ]
      },
      "streamSettings": {
        "network": "ws",
        "wsSettings": {
          "acceptProxyProtocol": true,
          "path": "/vmessws"
        }
      }
    }
  ],
  "outbounds": [
    {
      "protocol": "freedom"
    }
  ]
}
|
最后开启服务端防火墙的443和80端口,如果有另外的软件限制服务器内部端口之间的访问,也要打开相应的端口。
Linux客户端使用VLESS+TCP+XTLS配置:
 1
 2
 3
 4
 5
 6
 7
 8
 9
10
11
12
13
14
15
16
17
18
19
20
21
22
23
24
25
26
27
28
29
30
31
32
33
34
35
36
37
38
39
|
{
  "inbounds": [
    {
      "port": 1080,
      "listen": "127.0.0.1",
      "protocol": "socks",
      "settings": {
        "udp": true
      }
    }
  ],
  "outbounds": [
    {
      "protocol": "vless",
      "settings": {
        "vnext": [
          {
            "address": "example.com",
            "port": 443,
            "users": [
              {
                "id": "UUID",
                "flow": "xtls-rprx-splice",
                "encryption": "none"
              }
            ]
          }
        ]
      },
      "streamSettings": {
        "network": "tcp",
        "security": "xtls",
        "xtlsSettings": {
          "serverName": "example.com"
        }
      }
    }
  ]
}
|
Linux客户端使用VMESS+WS+TLS配置:
 1
 2
 3
 4
 5
 6
 7
 8
 9
10
11
12
13
14
15
16
17
18
19
20
21
22
23
24
25
26
27
28
29
30
31
32
33
34
35
36
37
38
39
40
41
|
{
  "inbounds": [
    {
      "port": 1080,
      "listen": "127.0.0.1",
      "protocol": "socks",
      "settings": {
        "udp": true
      }
    }
  ],
  "outbounds": [
    {
      "protocol": "vmess",
      "settings": {
        "vnext": [
          {
            "address": "x.example.com",
            "port": 443,
            "users": [
              {
                "id": "UUID",
                "security": "none"
              }
            ]
          }
        ]
      },
      "streamSettings": {
        "network": "ws",
        "security": "tls",
        "tlsSettings": {
          "serverName": "x.example.com"
        },
        "wsSettings": {
          "path": "/vmessws"
        }
      }
    }
  ]
}
|